insomnihack

When sleep eludes, the keyboard beckons

Multiple Python Versions on OSX with Virtualenv and Homebrew

June 1, 2011 Dale 2 Comments

Since writing my post on configuring multiple versions of Python on OSX with Virtualenv and Macports, I’ve switched from Macports to Homebrew as my package manager for Unix utilities on OSX. I did this for a couple of reasons. Homebrew seems to install less dependencies than Macports or Fink. Also, most of my Python development has settled on Python 2.7 and occasionally Python 3 for tasks that don’t require external libraries that only run on Python 2.x. So for me, an easier install with less gunk on my hard drive is a fair trade for losing the latest updates to Python 2.4, 2.5, and 2.6. In this post, I’ll describe my setup.

The first thing I did was uninstall Macports. Homebrew has fairly up-to-date versions all of the Unix packages I use on a daily basis, including git, subversion, bash_completion, Python, Qt, PyQt, and their supporting libraries. As such, I don’t need Macports taking up additional hard drive space and potentially causing conflicts with Homebrew’s packages.

Next, I installed (or update) pip, virtualenv, and virtualenvwrapper in my Mac’s default Python (2.6.1 on Snow Leopard) via easy_install (or pip itself). These are usually the only 3rd-party Python packages I install in the system Python’s site-packages folder.

The next step is to brew install the packages I mentioned above. If you’re looking for a Unix port other than those I use, check out the formula folder on Github for the current list of packages supported by Homebrew. You can also use brew search to get a list at the Terminal (fwiw, I use iTerm).

Next, I remove the Macports configuration from my bash ~/.profile and replace it with the following:

[text]
# virtualenvwrapper
export WORKON_HOME=$HOME/VirtualEnvs
if [ -f /usr/local/bin/virtualenvwrapper.sh ]; then
source /usr/local/bin/virtualenvwrapper.sh
fi

# bash completion
if [ -f `brew –prefix`/etc/bash_completion ]; then
. `brew –prefix`/etc/bash_completion
fi

# Python 2.6.1
alias mkve26=’mkvirtualenv –no-site-packages’
# Python 2.7.1
alias mkve=’mkvirtualenv –no-site-packages –python=/usr/local/Cellar/python/2.7.1/bin/python’
alias mkveqt=’mkvirtualenv –python=/usr/local/Cellar/python/2.7.1/bin/python’
alias designer=’open /usr/local/Cellar/qt/4.7.2/bin/Designer.app’
# Python 3.2
alias mkve3=’mkvirtualenv –no-site-packages –python=/usr/local/Cellar/python3/3.2/bin/python3′

# Ammend python path for Homebrew PyQt
export PYTHONPATH=/usr/local/lib/python:$PYTHONPATH
[/text]

The first couple of sections set up the Terminal for bash completion and virtualenvwrapper commands. The third section sets up my virtualenv aliases: one for the default system python, one for Python 2.7, one for Python 2.7 and PyQt, and another for Python 3.2. Python 3 support was added to virtualenv in version 1.6, so you no longer need to jump through hoops to get it working with Pythyon 2.x.
Programming mac, Python, virtualenv

Multiple Python Versions on OSX with Virtualenv and Macports

September 22, 2010 Dale 10 Comments

Update: I’ve recently switched from Macports to Homebrew. I describe my new configuration in this post.

Here’s a rundown of how I get multiple versions of Python working on OSX. I’m running Snow Leopard on an older Macbook Pro that can  only run in 32-bit mode. If you’ve got a newer 64-bit Mac, your mileage may vary. In the next month or so, work will be providing me with a new iMac. If I run into any issues using this technique on that 64-bit machine, I’ll update this post.

Installing Macports

If you don’t already have it installed, grab the DMG file for Macports. Verify that you have Xcode installed, and optionally, the X11 User package if you plan to install ports that use X-Windows (X11 User is installed by default on Leopard and Snow Leopard).

Installing Python

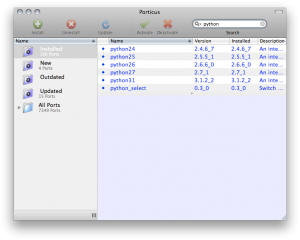
Now that you’ve got Macports installed, its time to install the versions of Python you want to work with. I’ll be describing the steps you’ll take at the Terminal to get all versions of Python that Macports supports installed, but you could just as easily use a Macports GUI like Porticus to install these packages. You might also only want a subset of these packages installed.

Installing Macports via Porticus

Installing Macports via Porticus

From a shell prompt, enter the following commands.

[text]
sudo port -v selfupdate
sudo port install python24
sudo port install python25
sudo port install python26
sudo port install python27
sudo port install python31
sudo port install python_select
[/text]

At the time his post was written, executing these commands would install Python 2.4.6, 2.5.5, 2.6.6, 2.7, and 3.1.2, along with python_select into /opt/local/bin. Running python_select with the -l option from the Terminal should result in something like this.

[shell]
[dale@DaleBook ~]$ python_select -l
Available versions:
current none python24 python25 python26 python26-apple python27 python31
[/shell]

On Snow Leopard, you’ll see a python26-apple option like above. On Leopard, you’ll see python25-apple. This is the system Python installation.

Installing Virtualenv

If you haven’t done so already, now it is time to install virtualenv and virtualenvwrapper into your system Python. Now, you don’t have to install them into your main Python. You could switch to another one of the installed versions with python_select, but then you’d have to remember to switch to that version before using your virtual environments, and you might encounter configuration issues with editors. I just find installing these into the system Python results in less headaches.

Both of these are installable via Macports, easy_install, or pip. I’ll stick to the easy_install route, although I tend to favor pip when working with the virtual environments themselves.

[shell]
sudo easy_install virtualenv
sudo easy_install virtualenvwrapper
[/shell]

Pick a location to store your virtual environments in (I use ~/Envs), then add an export statement to your ~/.profile file to point WORKON_HOME to this location. See the virtualenvwrapper docs for more information on configuring this if you run into problems.

Create and Use a Virtual Environment

Now lets try it all out. Let’s create a virtual environment running Python 2.7. From the Terminal, enter the following:

[text]
mkvirtualenv –no-site-packages –python=/opt/local/bin/python2.7 py27
[/text]

This should result in a new virtual environment based on Python 2.7. By changing the path specified with the –python option, you’ll be able to create a clean install of any of the versions of Python supported by Macports. Again, see the virtualenvwrapper documentation for more information on how to switch between and manage your virtual environments.

Programming mac, Python, virtualenv

Speed up PyCharm Debugging with Psyco

August 7, 2010 Dale 4 Comments

I’ve been digging what JetBrains is doing with PyCharm, and I’m looking forward to the 1.0 release. Almost everyone doing Python development at work has switched to it. I noticed something a while back that peaked my curiosity, though. While debugging, I came across a cryptic message in PyCharm’s console window:

[text]
pydev debugger: warning: psyco not available for speedups (the debugger will still work correctly, but a bit slower)
[/text]

What’s all this now? Are you saying something on my box isn’t running as fast as it could be? That wouldn’t do at all.

So, I loaded up my web browser. A quick Google search later and I’d found the psyco project on Sourceforge. Psyco is a specialized Python compiler, created by Armin Rigo who is now working on PyPy. Psyco speeds up the execution of most Python programs with a single extension module. Development of psyco was recently taken over by Christian Tismer, who has made many improvements to psyco.

At work, I tend to live in Windows or Ubuntu, and at the moment I was working in Windows, so I followed the link over to Michael Foord’s site where he’d thrown together some 32-bit Windows binaries for psyco 2.0 on Python 2.4, 2.5, and 2.6. I grabbed the 2.6 version, but I didn’t immediately install it.

To gauge the benefit of a psyco-powered debugger versus one without, I first needed to run a baseline benchmark. My work box is a Dell Precision T7400 with an Intel Zeon E5405 @ 2.0Ghz with 8Gb ram on Windows XP SP2 x64. My Python version is 2.6.5 (32-bit – psyco does not as yet work with x64).

I created a new Python project, and copied the pystone.py benchmark file from my Python distribution’s test folder into it. Here’s the results of my first non-psyco debugger run.

[text highlight=”6″]
C:/Tools/Python26/python.exe "C:\Program Files (x86)\JetBrains\PyCharm 96.742\helpers\pydev\pydevd.py" –client 127.0.0.1 –port 13926 –file C:/Source/PsycoTest/pystone.py
Connected to pydevd (version 1.1)
pydev debugger: warning: psyco not available for speedups (the debugger will still work correctly, but a bit slower)
pydev debugger: starting
Pystone(1.1) time for 50000 passes = 8.70703
This machine benchmarks at 5742.49 pystones/second

Process finished with exit code 0
[/text]

Next, I installed psyco and ran the test again.

[text highlight=”5″]
C:/Tools/Python26/python.exe "C:\Program Files (x86)\JetBrains\PyCharm 96.742\helpers\pydev\pydevd.py" –client 127.0.0.1 –port 13936 –file C:/Source/PsycoTest/pystone.py
Connected to pydevd (version 1.1)
pydev debugger: starting
Pystone(1.1) time for 50000 passes = 5.49379
This machine benchmarks at 9101.18 pystones/second

Process finished with exit code 0
[/text]

Not too shabby. My pystone benchmark went from 5742.49 to 9101.18: a 63% improvement just by installing a Python library! Clearly I’m going to have to experiment using psyco for some of my own projects.

Programming PyCharm, Python, tools

« Previous Page
Next Page »

About Me

Hi, my name's Dale, and this is my tech blog. Read More…

Search

Tags

blogging c# database Django documentation Email furniture git hacks htpc IPython Linux mac nas packaging PyCharm Python Roleplaying tools twitter unit tests virtualenv Visual Studio vmware Windows

Copyright © 2025 · Equilibre Theme on Genesis Framework · WordPress · Log in